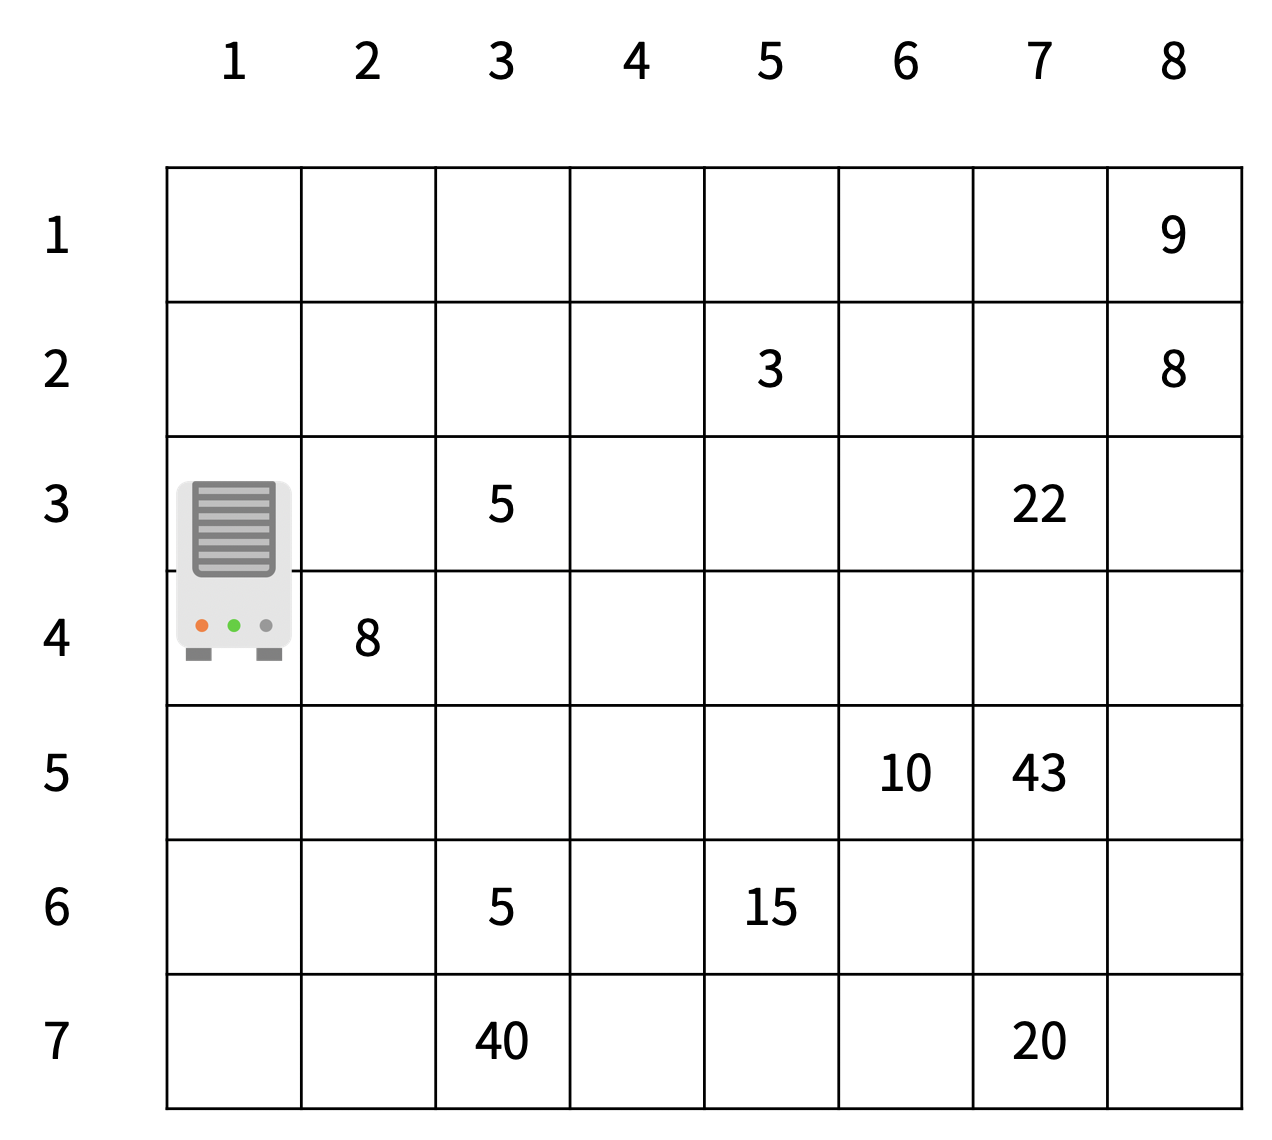
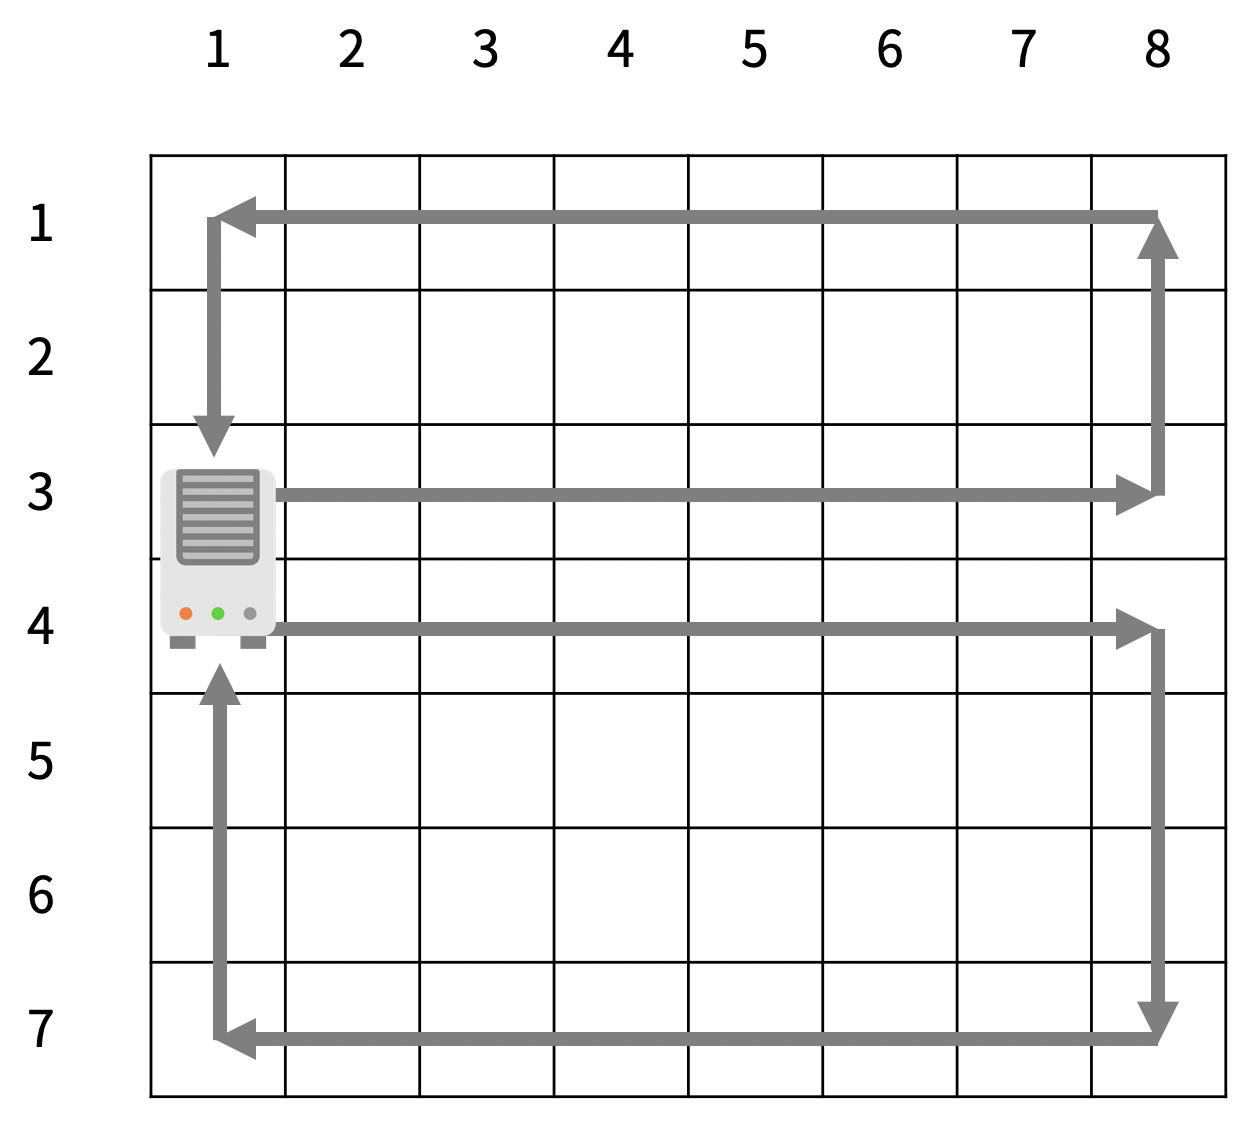
미세먼지를 제거하기 위해 구사과는 공기청정기를 설치하려고 한다. 공기청정기의 성능을 테스트하기 위해 구사과는 집을 크기가 R×C인 격자판으로 나타냈고, 1×1 크기의 칸으로 나눴다. 구사과는 뛰어난 코딩 실력을 이용해 각 칸 (r, c)에 있는 미세먼지의 양을 실시간으로 모니터링하는 시스템을 개발했다. (r, c)는 r행 c열을 의미한다.
공기청정기는 항상 1번 열에 설치되어 있고, 크기는 두 행을 차지한다. 공기청정기가 설치되어 있지 않은 칸에는 미세먼지가 있고, (r, c)에 있는 미세먼지의 양은 Ar,c이다.
1초 동안 아래 적힌 일이 순서대로 일어난다.
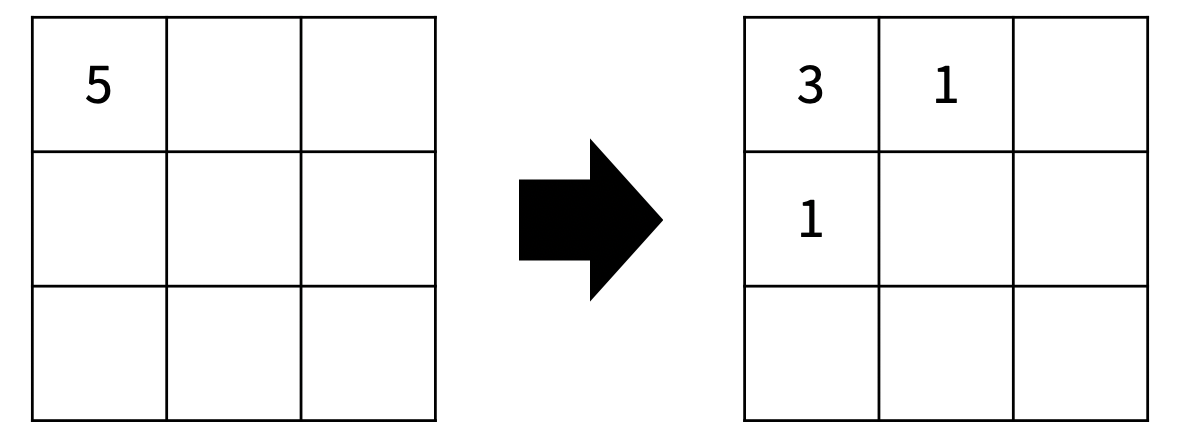
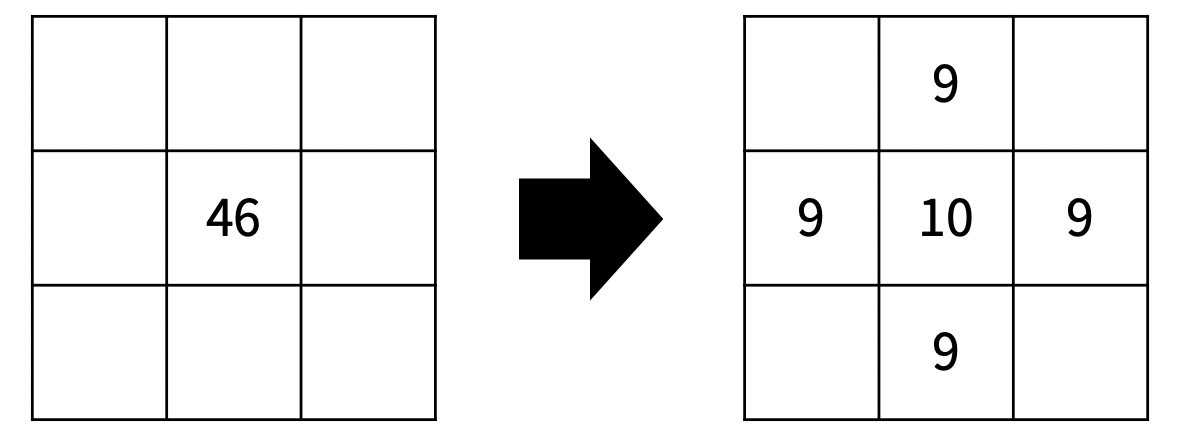
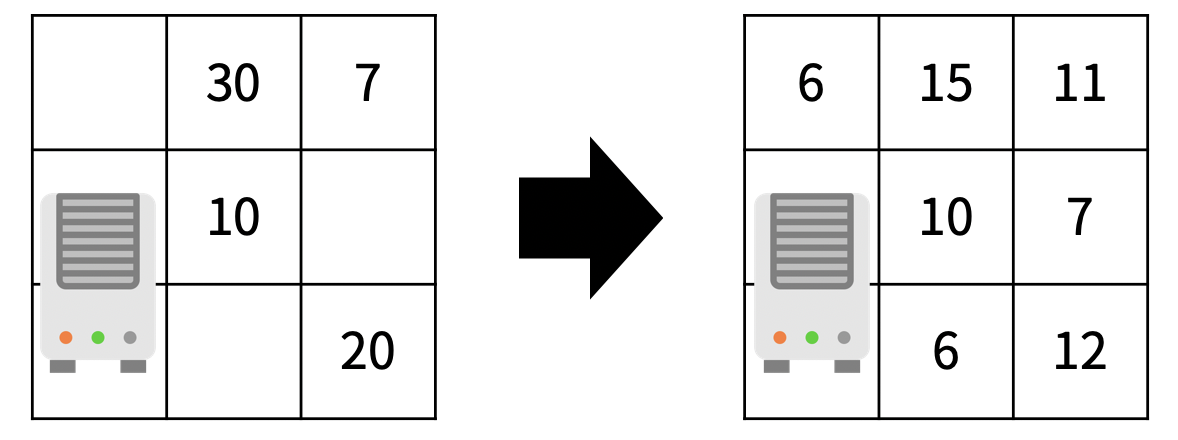
미세먼지가 확산된다. 확산은 미세먼지가 있는 모든 칸에서 동시에 일어난다.
(r, c)에 있는 미세먼지는 인접한 네 방향으로 확산된다.
인접한 방향에 공기청정기가 있거나, 칸이 없으면 그 방향으로는 확산이 일어나지 않는다.
확산되는 양은 Ar,c/5이고 소수점은 버린다.
(r, c)에 남은 미세먼지의 양은 Ar,c - (Ar,c/5)×(확산된 방향의 개수) 이다.
로봇 청소기가 있는 장소는 N×M 크기의 직사각형으로 나타낼 수 있으며, 1×1크기의 정사각형 칸으로 나누어져 있다. 각각의 칸은 벽 또는 빈 칸이다. 청소기는 바라보는 방향이 있으며, 이 방향은 동, 서, 남, 북중 하나이다. 지도의 각 칸은 (r, c)로 나타낼 수 있고, r은 북쪽으로부터 떨어진 칸의 개수, c는 서쪽으로 부터 떨어진 칸의 개수이다.
로봇 청소기는 다음과 같이 작동한다.
현재 위치를 청소한다.
현재 위치에서 현재 방향을 기준으로 왼쪽방향부터 차례대로 탐색을 진행한다.
왼쪽 방향에 아직 청소하지 않은 공간이 존재한다면, 그 방향으로 회전한 다음 한 칸을 전진하고 1번부터 진행한다.
왼쪽 방향에 청소할 공간이 없다면, 그 방향으로 회전하고 2번으로 돌아간다.
네 방향 모두 청소가 이미 되어있거나 벽인 경우에는, 바라보는 방향을 유지한 채로 한 칸 후진을 하고 2번으로 돌아간다.
네 방향 모두 청소가 이미 되어있거나 벽이면서, 뒤쪽 방향이 벽이라 후진도 할 수 없는 경우에는 작동을 멈춘다.
로봇 청소기는 이미 청소되어있는 칸을 또 청소하지 않으며, 벽을 통과할 수 없다.
입력(Input)
첫째 줄에 세로 크기 N과 가로 크기 M이 주어진다. (3 ≤ N, M ≤ 50)
둘째 줄에 로봇 청소기가 있는 칸의 좌표 (r, c)와 바라보는 방향 d가 주어진다. d가 0인 경우에는 북쪽을, 1인 경우에는 동쪽을, 2인 경우에는 남쪽을, 3인 경우에는 서쪽을 바라보고 있는 것이다.
셋째 줄부터 N개의 줄에 장소의 상태가 북쪽부터 남쪽 순서대로, 각 줄은 서쪽부터 동쪽 순서대로 주어진다. 빈 칸은 0, 벽은 1로 주어진다. 지도의 첫 행, 마지막 행, 첫 열, 마지막 열에 있는 모든 칸은 벽이다.
로봇 청소기가 있는 칸의 상태는 항상 빈 칸이다.
출력(Output)
첫째 줄에 T초가 지난 후 구사과 방에 남아있는 미세먼지의 양을 출력한다.
1. 문제 풀이
이 문제를 풀때에 생각해야 할 것은 두 가지 입니다.
최초의 자리도 청소
바라보고 있는 방향에 따라서 왼쪽의 좌표를 설정하는 것
최초에 자리를 청소한다고 하고 map에서 현 자리를 청소 한걸로 표시하고 스타트 합니다.
그리고 바라보고 있는 방향 왼쪽 좌표를 바라보기 때문에 배열에 현재 바라보고 있는 방향을 인덱스로 왼쪽을 보는 값을 고정 시켜줍니다. 저는
// 북 - (0,-1), 동 - (-1,0), 남 - (0,1), 서 - (1,0) static int[][] left = { {0, -1, 0, 1}, {-1, 0, 1, 0}, };
으로 고정시켜서 사용하였습니다.
현재 북쪽을 바라보고 있고, 왼쪽 방향을 탐색하려 합니다.
left[0][] 에 있는 값을 현재 위치에서 더해주고, 청소가 가능하면 청소를하고 해당 방향으로 변경
청소가 불가능하면 해당 방향으로 회전하여 다시 진행
네 방향 모두 불가한 것을 체크하기 위해 count 변수를 두어 확인해 주고 네 방향 전부 불가능 하면 현재 바라보고 있는 방향에서 뒤로 한 칸 후진 합니다.
만약 후진도 못하면 종료합니다.
이것을 코드로 표현하겠습니다.
importjava.io.BufferedReader;importjava.io.IOException;importjava.io.InputStreamReader;importjava.util.StringTokenizer;publicclassRobot_Vaccumcleaner{// 3 <= N, M <= 50 || 0 - empty, 1 - wall// d : 0 - North, 1 - East, 2 - South, 3 - West// 현재 위치에서 현재 방향을 기준으로 왼쪽방향부터 차례대로 탐색// 로봇 청소기가 있는 칸의 상태는 항상 빈 칸이다.staticintN,M,r,c,d;staticintclean;staticint[][]map;// 바라보고 있는 방향에 따라서 탐색하는 왼쪽의 좌표가 다르다.// 북 - (0,-1), 동 - (-1,0), 남 - (0,1), 서 - (1,0)staticint[][]left={{0,-1,0,1},{-1,0,1,0},};staticvoidcleanning(){intcnt=0;while(true){intnxR=r+left[0][d];intnxC=c+left[1][d];if(nxR<0||N<=nxR||nxC<0||M<=nxC||map[nxR][nxC]==-1||map[nxR][nxC]==1){// 왼쪽에 청소 할 공간이 없다면, 그 위치로 회전.if(cnt>=4){// 네 방향 모두 청소가 되어 있거나 벽인경우 방향 그대로 뒤로 후진switch(d){case0:nxR=r+1;nxC=c;break;case1:nxR=r;nxC=c-1;break;case2:nxR=r-1;nxC=c;break;case3:nxR=r;nxC=c+1;break;}if(map[nxR][nxC]==1){// 네 방향 모두 청소가 됭 있고, 뒤가 벽인 경우 종료.break;}r=nxR;c=nxC;cnt=0;}else{d-=1;if(d<0)d=3;cnt++;}}elseif(map[nxR][nxC]==0){// 왼쪽 방향에 청소 공간이 존재한다면,d-=1;if(d<0)d=3;map[nxR][nxC]=-1;clean++;cnt=0;r=nxR;c=nxC;}}}publicstaticvoidmain(String[]args)throwsIOException{BufferedReaderbr=newBufferedReader(newInputStreamReader(System.in));StringTokenizerst=newStringTokenizer(br.readLine());N=Integer.parseInt(st.nextToken());M=Integer.parseInt(st.nextToken());map=newint[N][M];st=newStringTokenizer(br.readLine());r=Integer.parseInt(st.nextToken());c=Integer.parseInt(st.nextToken());d=Integer.parseInt(st.nextToken());for(inti=0;i<N;i++){if(!st.hasMoreTokens())st=newStringTokenizer(br.readLine());for(intj=0;j<M;j++){map[i][j]=Integer.parseInt(st.nextToken());}}clean=1;map[r][c]=-1;cleanning();System.out.println(clean);}}
벽을 3개 세운 뒤, 바이러스가 퍼질 수 없는 곳을 안전 영역이라고 한다. 위의 지도에서 안전 영역의 크기는 27이다.
연구소의 지도가 주어졌을 때 얻을 수 있는 안전 영역 크기의 최댓값을 구하는 프로그램을 작성하시오.
입력 (Input)
첫째 줄에 지도의 세로 크기 N과 가로 크기 M이 주어진다. (3 ≤ N, M ≤ 8)
둘째 줄부터 N개의 줄에 지도의 모양이 주어진다. 0은 빈 칸, 1은 벽, 2는 바이러스가 있는 위치이다. 2의 개수는 2보다 크거나 같고, 10보다 작거나 같은 자연수이다.
빈 칸의 개수는 3개 이상이다.
출력(Output)
첫째 줄에 얻을 수 있는 안전 영역의 최대 크기를 출력한다.
1. 문제풀이
이 문제를 풀때에 생각해야할 부분은 두 가지 입니다.
이 차원 배열로 이루어진 map에 임의의 벽 3개를 어떤 방식으로 세운다고 가정할 것인가?
확산시 방문 체크와 어떻게 전체에 바이러스를 퍼졌다고 할까?
1번은 완전 탐색 DFS를 통해서 세우고 해제하고를 하며 재귀를 돌아 최종적으로 벽을 3개 세웠을 때, 확산을 실행하여 남은 안전 영역을 구하면 됩니다.
2번은 확산에 대한 좌표를 큐에 담고, 큐에서 바이러스가 있는 공간을 하나씩 빼서 상, 하, 좌, 우로 바이러스가 퍼질 수 있는 공간이면 맵에 기록하고 큐에 새로운 바이러스를 넣어주며 큐에 더이상 확산할 수 있는 바이러스가 없을때까지 반복하여 해결합니다.
이것을 코드로 표현하겠습니다.
importjava.io.BufferedReader;importjava.io.IOException;importjava.io.InputStreamReader;importjava.util.ArrayList;importjava.util.LinkedList;importjava.util.Queue;importjava.util.StringTokenizer;publicclassInstitute{// 벽을 3개 세운 뒤, 바이러스가 퍼질 수 없는 곳을 안전 영역이라고 한다.// 바이러스는 상, 하, 좌, 우로 퍼져 나간다.// 0은 빈칸, 1은 벽, 2는 바이러스staticintN,M,safty,listSize;staticArrayList<Block>list,virusList;staticQueue<Block>virus;staticint[][]map;staticboolean[][]visited;staticint[][]dif={{0,1,-1,0},{1,0,0,-1},};staticvoidvirus(intcnt,intidx){if(cnt==3){visited=newboolean[N][M];diffusion();intmax=searchSafy();if(max>safty)safty=max;return;}if(listSize<=idx)return;Blocktmp=list.get(idx);map[tmp.x][tmp.y]=1;virus(cnt+1,idx+1);map[tmp.x][tmp.y]=0;virus(cnt,idx+1);}staticvoiddiffusion(){virus.clear();for(inti=0;i<virusList.size();i++){virus.add(virusList.get(i));}while(!virus.isEmpty()){Blocktmp=virus.poll();visited[tmp.x][tmp.y]=true;for(inti=0;i<4;i++){intnx=tmp.x+dif[0][i];intny=tmp.y+dif[1][i];if(0<=nx&&nx<N&&0<=ny&&ny<M&&map[nx][ny]==0&&!visited[nx][ny]){visited[nx][ny]=true;virus.add(newBlock(nx,ny));}}}}staticintsearchSafy(){intarea=0;for(inti=0;i<N;i++){for(intj=0;j<M;j++){if(map[i][j]==0&&!visited[i][j])area++;}}returnarea;}publicstaticvoidmain(String[]args)throwsIOException{BufferedReaderbr=newBufferedReader(newInputStreamReader(System.in));StringTokenizerst=newStringTokenizer(br.readLine());N=Integer.parseInt(st.nextToken());M=Integer.parseInt(st.nextToken());map=newint[N][M];list=newArrayList<>();virusList=newArrayList<>();virus=newLinkedList<Block>();for(inti=0;i<N;i++){if(!st.hasMoreTokens())st=newStringTokenizer(br.readLine());for(intj=0;j<M;j++){map[i][j]=Integer.parseInt(st.nextToken());if(map[i][j]==0){list.add(newBlock(i,j));listSize++;}elseif(map[i][j]==2)virusList.add(newBlock(i,j));}}safty=0;virus(0,0);System.out.println(safty);}publicstaticclassBlock{intx,y;publicBlock(intx,inty){this.x=x;this.y=y;}}}
해당 문제는 DP(Dynamic Programing) 또는 완전탐색으로 풀 수 있는 문제입니다.
우선 문제를 DP를 이용해서 풀어보고, 그 다음 완전탐색을 이용해서 풀어 보았습니다.
14051. 퇴사
상담원으로 일하고 있는 백준이는 퇴사를 하려고 한다.
오늘부터 N+1일째 되는 날 퇴사를 하기 위해서, 남은 N일 동안 최대한 많은 상담을 하려고 한다.
백준이는 비서에게 최대한 많은 상담을 잡으라고 부탁을 했고, 비서는 하루에 하나씩 서로 다른 사람의 상담을 잡아놓았다.
각각의 상담은 상담을 완료하는데 걸리는 기간 Ti와 상담을 했을 때 받을 수 있는 금액 Pi로 이루어져 있다.
N = 7인 경우에 다음과 같은 상담 일정표를 보자.
1일
2일
3일
4일
5일
6일
7일
Ti
3
5
1
1
2
4
2
Pi
10
20
10
20
15
40
200
1일에 잡혀있는 상담은 총 3일이 걸리며, 상담했을 때 받을 수 있는 금액은 10이다. 5일에 잡혀있는 상담은 총 2일이 걸리며, 받을 수 있는 금액은 15이다.
상담을 하는데 필요한 기간은 1일보다 클 수 있기 때문에, 모든 상담을 할 수는 없다. 예를 들어서 1일에 상담을 하게 되면, 2일, 3일에 있는 상담은 할 수 없게 된다. 2일에 있는 상담을 하게 되면, 3, 4, 5, 6일에 잡혀있는 상담은 할 수 없다.
또한, N+1일째에는 회사에 없기 때문에, 6, 7일에 있는 상담을 할 수 없다.
퇴사 전에 할 수 있는 상담의 최대 이익은 1일, 4일, 5일에 있는 상담을 하는 것이며, 이때의 이익은 10+20+15=45이다.
상담을 적절히 했을 때, 백준이가 얻을 수 있는 최대 수익을 구하는 프로그램을 작성하시오.
입력(Input)
첫째 줄에 N (1 ≤ N ≤ 15)이 주어진다.
둘째 줄부터 N개의 줄에 Ti와 Pi가 공백으로 구분되어서 주어지며, 1일부터 N일까지 순서대로 주어진다. (1 ≤ Ti ≤ 5, 1 ≤ Pi ≤ 1,000)
출력(Output)
첫째 줄에 백준이가 얻을 수 있는 최대 이익을 출력한다.
1. DP로 접근
해당 문제는 첫째날–>마지막날로 접근하는 것보다, 마지막날–>첫째날로 접근하는 것이 더 쉽습니다.
7일에 잡혀있는 일은 2일이 걸리기 때문에 아무리 금액이 높더라도 진행할 수 없습니다.
6일에도 4일이 걸리기 때문에 N+1 즉, 7일이 넘어가기 때문에 진행할 수 없습니다.
5일에는 2일이 걸리는 일이 있습니다. 5~6일에 일을 하고 얻는 15의 수익이 얻을 수 있는 최대 수익입니다.
4일째에는 1일짜리 일을 추가로 하고, 5일까지의 일에 더해주는 것이 최대 수익이 됩니다. 즉, 20 + 15 = 35
3일째에도 1일짜리 일을 추가로 하고, 4일까지의 일에 더해주는 것이 최대 수익이 됩니다. 10 + 20 + 15 = 45
2일째에는 5일이 걸리는 일이 있습니다. 5일을 했을때 최대 이익과 위에서 했던 일중에서 비교를 해봐야 합니다.
2~6일까지 일을 해서 얻는 수익은 20입니다.
이것은 3~6까지 세가지 일을 해서 얻는 수익 45와 비교하면 낮습니다. 그러므로 2일째 일은 하지 않습니다.
1일째에도 마찬가지로 3일이 걸리는 일이 있습니다.
1~3일을 일을 하면 10의 수익을 얻을 수 있습니다.
이것은 3일째에 일을 하는 10의 수익과 같습니다. 그러므로 1일째에 일을 선택하던지 3일째의 일을 선택하던지 하면 최대 수익을 얻을 수 있습니다.
1일
2일
3일
4일
5일
6일
7일
Ti
3
5
1
1
2
4
2
Pi
10
20
10
20
15
40
200
DP
45
45
45
35
15
-
-
이러한 조건에서 위와 같이 최대 수익은 45가 나올 수 있습니다.
이것을 코드로 표현하겠습니다.
importjava.io.BufferedReader;importjava.io.IOException;importjava.io.InputStreamReader;importjava.util.StringTokenizer;/**
* 14501. 퇴사
* @author gahusb
* Input : N - 퇴사전까지 남은 기간, Ti - 상담을 완료하는데 걸리는 기간, Pi - 상담을 했을 때 받을 수 있는 금액
* Output : 상담을 적절히 했을 때, 백준이가 얻을 수 있는 최대 수익
*
*/publicclassResignation{staticint[]t,p,dp;staticvoidcalcMaxIncome(intdDay){intnext;for(inti=dDay;i>0;i--){next=i+t[i];if(next>dDay+1){dp[i]=dp[i+1];}else{dp[i]=dp[i+1]>dp[next]+p[i]?dp[i+1]:dp[next]+p[i];}}System.out.println(dp[1]);}publicstaticvoidmain(String[]args)throwsIOException{BufferedReaderbr=newBufferedReader(newInputStreamReader(System.in));StringTokenizerst=newStringTokenizer(br.readLine());intN=Integer.parseInt(st.nextToken());t=newint[N+2];p=newint[N+2];dp=newint[N+2];for(inti=1;i<=N;i++){if(!st.hasMoreTokens())st=newStringTokenizer(br.readLine());t[i]=Integer.parseInt(st.nextToken());p[i]=Integer.parseInt(st.nextToken());}calcMaxIncome(N);}}
Most elements now have rounded borders, making the design look more modern (dare I say “Stripe-ified”) than ever before.
The goal of Hydejack was always to provide a theme that looks “designed” combined the amenities of a typical Jekyll theme for coders. This is an important step in maintaining this goal.
At the same time, I’m introducing nerdy elements like breadcrumbs, that are almost ornamental in nature. You wouldn’t find these on other Stripe-like designs, but I think they are appealing to developer types like myself. Like most additions to Hydejack, they can be disabled via configuration.
Inverted Sidebars
The colors on the sidebar can now be inverted to allow brighter sidebar images. This can be enabled per-page in the fort matter:
Code blocks with and without headers now also come with a copy button. In the case of header-less code blocks, the button only shows on hover to prevent potential overlap.
Note that this requires a directory-like URL structure on your entire site, otherwise the intermediate links will point to nonexisting sites.
On a side note, Hydejack now has built-in tooltips for abbreviations like SERP (activated via tap/click). See Example Content on how to add them to your content.
Last Modified At
Blog posts can now have a “last modified at” date in the sub title row.
Note that this depends on the last_modified_at property of the page, which must be either set manually in the frontmatter (not recommended), or via a plugin like jekyll-last-modified-at. Note that the later is not available when building on GitHub Pages and can increase build times.
Clap Button Preview
I’ve been trying something new with getclaps.app, a feedback and analytics tool for personal sites like those powered by Hydejack.
It is a separate product from Hydejack and not enabled by default. Because it depends on a backend component, it requires a monthly fee. If enabled, it is placed below posts and pages where the dingbat character (❖) used to be.
I can’t claim that this product is fully baked (feedback welcome), but I’ve been using it on my personal site and here for the last couple of months with no issues. For more, see the dedicated website.
There are many more changes and bugfixes in 9.1. See the CHANGELOG for details.
Ever since the introduction of Dark Mode, link styles have been a bit of an issue. Specifically, finding an accent color that worked on both light and dark backgrounds was the problem. With Hydejack 9, the link style has been revamped so that legibility is no longer tied to the choice of accent_color, giving you much more freedom in creating a unique design flavor for your site.
Ready for the Big Screen
The theme on which Hydejack is based was designed for a different era of the web. Hydejack has inherited many of its limitations, but over time I’ve made adjustments, such as centering the content column for better reading ergonomics.
With version 9, Hydejack takes full advantage of large displays. Whether it’s design indulgences such as oversized headlines, or quality of life improvements such as a floating table of contents, Hydejack now finds use for all that extra screen real estate1.
What’s in the Cards?
Hydejack 9 now lets you use content cards for both projects and posts. The cards have been redesigned with a new hover style and drop shadows and they retain their unique transition-to-next-page animations, which now also work on the blog layout. The new grid layout lets you do that.
Good images are key to making the most out of content cards. For that reason, a chapter on images has been added to the documentation.
Built-In Search
Hydejack now has Built-In Search. It even works offline. I’ve been prototyping many approaches and eventually settled on a fully client-side, off-the-main thread solution that perfectly fits the use case of personal sites and shows surprisingly good results2.
The new search UI is custom made for Hydejack and shows beautiful previews of your posts and pages, right on top of your regular content.
Together with the Auto-Hiding Navbar, your entire content library is now only a couple of keystrokes away.
Auto-Hiding Navbar
A navbar that’s there when you need it, and disappears when you don’t. Simple as that.
Sticky Table of Contents
Already a staple on so many sites on the web, this pattern is now also available in Hydejack. What’s unique about it is that it simply picks up the table of contents already created by kramdown’s {:toc} tag and transparently upgrades it to a fully dynamic version.
…and much more
Other noteworthy changes include:
Support for Jekyll 4
Choice between MathJax and KaTeX for math rendering
Use of jekyll-include-cache for drastically improved page building speeds
New variables configuration file — adjust content width, sidebar width, font size, etc…
…and the option to disable grouping projects by year.
Read the the CHANGELOG for the full scope of features and improvements made in Hydejack 9. Maybe just glance at it to confirm that it is indeed a pretty long list.
Even More to Come
New features for 9.1 are already lined up. Code block headers and code line highlights for even better technical blogging, as well as download buttons on the resume page for PDF, vCard, and Resume JSON are just around the corner.
Get It Now
The Free Version of Hydejack is now availabe on RubyGems and for the first time also on GitHub Packages. The source code is available on GitHub as always.
The PRO Version is scheduled to release on July 7th on Gumroad. Pre-Orders are open now:
If you are a fan of the old two-column layout, or don’t like modern design tropes such as mega headlines, Hydejack lets you revert these changes on a case-by-case basis via configuration options. ↩︎
Search was mainly tested for English and German. Please let me know about issues in other languages. While I’ve tried to find a multi-language solution, most showed drastically worse results for the English base case. If you’re technically inclined, you can adopt the code located in _includes/js/search-worker.js to your needs. ↩︎
A page showing Hydejack-specific markdown content.
Hydejack offers a few additional features to markup your markdown. Don’t worry, these are merely CSS classes added with kramdown’s {:...} syntax, so that your content remains compatible with other Jekyll themes.
Large Tables
Default aligned
Left aligned
Center aligned
Right aligned
Default aligned
Left aligned
Center aligned
Right aligned
Default aligned
Left aligned
Center aligned
Right aligned
Default aligned
Left aligned
Center aligned
Right aligned
First body part
Second cell
Third cell
fourth cell
First body part
Second cell
Third cell
fourth cell
First body part
Second cell
Third cell
fourth cell
First body part
Second cell
Third cell
fourth cell
Second line
foo
strong
baz
Second line
foo
strong
baz
Second line
foo
strong
baz
Second line
foo
strong
baz
Third line
quux
baz
bar
Third line
quux
baz
bar
Third line
quux
baz
bar
Third line
quux
baz
bar
Second body
Second body
Second body
Second body
2 line
2 line
2 line
2 line
Footer row
Footer row
Footer row
Footer row
Code blocks
// Example can be run directly in your JavaScript console// Create a function that takes two arguments and returns the sum of those// argumentsvaradder=newFunction("a","b","return a + b");// Call the functionadder(2,6);// > 8
This is a normal paragraph following a header. GitHub is a code hosting platform for version control and collaboration. It lets you and others work together on projects from anywhere.
Header 3
This is a blockquote following a header.
When something is important enough, you do it even if the odds are not in your favor.
// Javascript code with syntax highlighting.varfun=functionlang(l){dateformat.i18n=require('./lang/'+l)returntrue;}
# Ruby code with syntax highlightingGitHubPages::Dependencies.gems.eachdo|gem,version|s.add_dependency(gem,"= #{version}")end
Header 4
This is an unordered list following a header.
This is an unordered list following a header.
This is an unordered list following a header.
Header 5
This is an ordered list following a header.
This is an ordered list following a header.
This is an ordered list following a header.
Header 6
head1
head two
three
ok
good swedish fish
nice
out of stock
good and plenty
nice
ok
good oreos
hmm
ok
good zoute drop
yumm
There’s a horizontal rule below this.
Here is an unordered list:
Item foo
Item bar
Item baz
Item zip
And an ordered list:
Item one
Item two
Item three
Item four
And a nested list:
level 1 item
level 2 item
level 2 item
level 3 item
level 3 item
level 1 item
level 2 item
level 2 item
level 2 item
level 1 item
level 2 item
level 2 item
level 1 item
Small image
Large image
Definition lists
Name
Godzilla
Born
1952
Birthplace
Japan
Color
Green
Long, single-line code blocks should not wrap. They should horizontally scroll if they are too long. This line should be long enough to demonstrate this. Or is it?
Howdy! This is an example blog post that shows several types of HTML content supported in this theme.
Cum sociis natoque penatibus et magnis dis parturient montes, nascetur ridiculus mus. Aenean eu leo quam. Pellentesque ornare sem lacinia quam venenatis vestibulum. Sed posuere consectetur est at lobortis. Cras mattis consectetur purus sit amet fermentum.
Curabitur blandit tempus porttitor. Nullam quis risus eget urna mollis ornare vel eu leo. Nullam id dolor id nibh ultricies vehicula ut id elit.
Etiam porta sem malesuada magna mollis euismod. Cras mattis consectetur purus sit amet fermentum. Aenean lacinia bibendum nulla sed consectetur.
Inline HTML elements
HTML defines a long list of available inline tags, a complete list of which can be found on the Mozilla Developer Network.
To bold text, use **To bold text**.
To italicize text, use *To italicize text*.
Abbreviations, like HTML should be defined like this *[HTML]: HyperText Markup Language.
Citations, like — Mark otto, should use <cite>.
Deleted text should use ~~deleted~~ and inserted text should use <ins>.
Superscript text uses <sup> and subscript text uses <sub>.
Most of these elements are styled by browsers with few modifications on our part.
Heading 2
Vivamus sagittis lacus vel augue rutrum faucibus dolor auctor. Duis mollis, est non commodo luctus, nisi erat porttitor ligula, eget lacinia odio sem nec elit. Morbi leo risus, porta ac consectetur ac, vestibulum at eros.
Heading 3
Vivamus sagittis lacus vel augue rutrum faucibus dolor auctor.
Heading 4
Vivamus sagittis lacus vel augue rutrum faucibus dolor auctor.
Heading 5
Vivamus sagittis lacus vel augue rutrum faucibus dolor auctor.
Heading 6
Vivamus sagittis lacus vel augue rutrum faucibus dolor auctor.
Code
Cum sociis natoque penatibus et magnis dis code element montes, nascetur ridiculus mus.
// Example can be run directly in your JavaScript console// Create a function that takes two arguments and returns the sum of those// argumentsvaradder=newFunction("a","b","return a + b");// Call the functionadder(2,6);// > 8
Lists
Cum sociis natoque penatibus et magnis dis parturient montes, nascetur ridiculus mus. Aenean lacinia bibendum nulla sed consectetur. Etiam porta sem malesuada magna mollis euismod. Fusce dapibus, tellus ac cursus commodo, tortor mauris condimentum nibh, ut fermentum massa justo sit amet risus.
Praesent commodo cursus magna, vel scelerisque nisl consectetur et.
Donec id elit non mi porta gravida at eget metus.
Nulla vitae elit libero, a pharetra augue.
Donec ullamcorper nulla non metus auctor fringilla. Nulla vitae elit libero, a pharetra augue.
Vestibulum id ligula porta felis euismod semper.
Cum sociis natoque penatibus et magnis dis parturient montes, nascetur ridiculus mus.
Maecenas sed diam eget risus varius blandit sit amet non magna.
Cras mattis consectetur purus sit amet fermentum. Sed posuere consectetur est at lobortis.
HyperText Markup Language (HTML)
The language used to describe and define the content of a Web page
Cascading Style Sheets (CSS)
Used to describe the appearance of Web content
JavaScript (JS)
The programming language used to build advanced Web sites and applications
Integer posuere erat a ante venenatis dapibus posuere velit aliquet. Morbi leo risus, porta ac consectetur ac, vestibulum at eros. Nullam quis risus eget urna mollis ornare vel eu leo.
Images
Quisque consequat sapien eget quam rhoncus, sit amet laoreet diam tempus. Aliquam aliquam metus erat, a pulvinar turpis suscipit at.
Tables
Aenean lacinia bibendum nulla sed consectetur. Lorem ipsum dolor sit amet, consectetur adipiscing elit.
Name
Upvotes
Downvotes
Alice
10
11
Bob
4
3
Charlie
7
9
Totals
21
23
Nullam id dolor id nibh ultricies vehicula ut id elit. Sed posuere consectetur est at lobortis. Nullam quis risus eget urna mollis ornare vel eu leo.